
I’m a beginner 3D printing novice. I have done about 5-6 successful prints so far, and my last two have technically come out fine, but they seem very brittle. By brittle, i mean that both prints have snapped cleanly into several pieces, not by design. My extremely novice research has led me to think it’s a layer adhesion issue - it is very cold here where I am right now, and I print in a non-climate controlled shed because of reasons. I do have an enclosure though, so i tried printing my PLA at 205 instead of 200, but same result. Is there a better way to correct prints snapping apart like that? I don’t feel like i used any excessive force.
Ender 3 Pro Polymaker dual matte white/black PLA 1.75mm
You must log in or register to comment.
Is your filament wet? Wet filament tends to be brittle.
Post pics of your first layer and final print.
I don’t think it was wet, it’s super dry in winter here, and i only bought it a week ago. As best i can see from the troubleshooting i did, i wasn’t letting the enclosure internal temperature get high enough before starting the print.
it could be a few things… to start off with, what’s the ambient temperature inside the enclosure? how cold is ‘cold’?
Regardless, first step is probably to print a temperature calibration tower. (Most PLA I’ve used prints much more happily at 215-225,) I like this version of it. there’s ways to set up the slicer to change the temperature at a given height. (For prusa, in the sliced preview pain, you can right click, it’s the same menu as ‘color change’ and stuff. Start high and work low, going about five or ten degrees at a time.)
If the tower comes out no different and still brittle/poor adhesion across the full range… then my first thought is thermal stress building up in the part. if your enclosure is still too gold, consider piling on some more insulation (a generic quilt or blanket over, or stapled around inside will do nicely. Cotton quilts also have the advantage of being difficult to set on fire/melt.)
you say the part is brittle- does it snap opposite layer lines? or along layers? if it breaks in directions not aligned with the layer lines as easily as it does aligned, then it’s probably not layer issues… at that point you have some sort of material issue. I’d suggest drying your filament out, and doing what you can to minimize the temperature changes during printing.
How cold is cold?
The printer says the hot end and bed are both ambient at 10C , which is 50F. For reference, it’s 21F outside right now.
Also, here is a picture of where it broke. The other print was similar. The crack can be seen on the left side of the pic.

Also, I think my nozzle is clogged now, all of a sudden my first layers have gone to garbage. Compounding failures lol
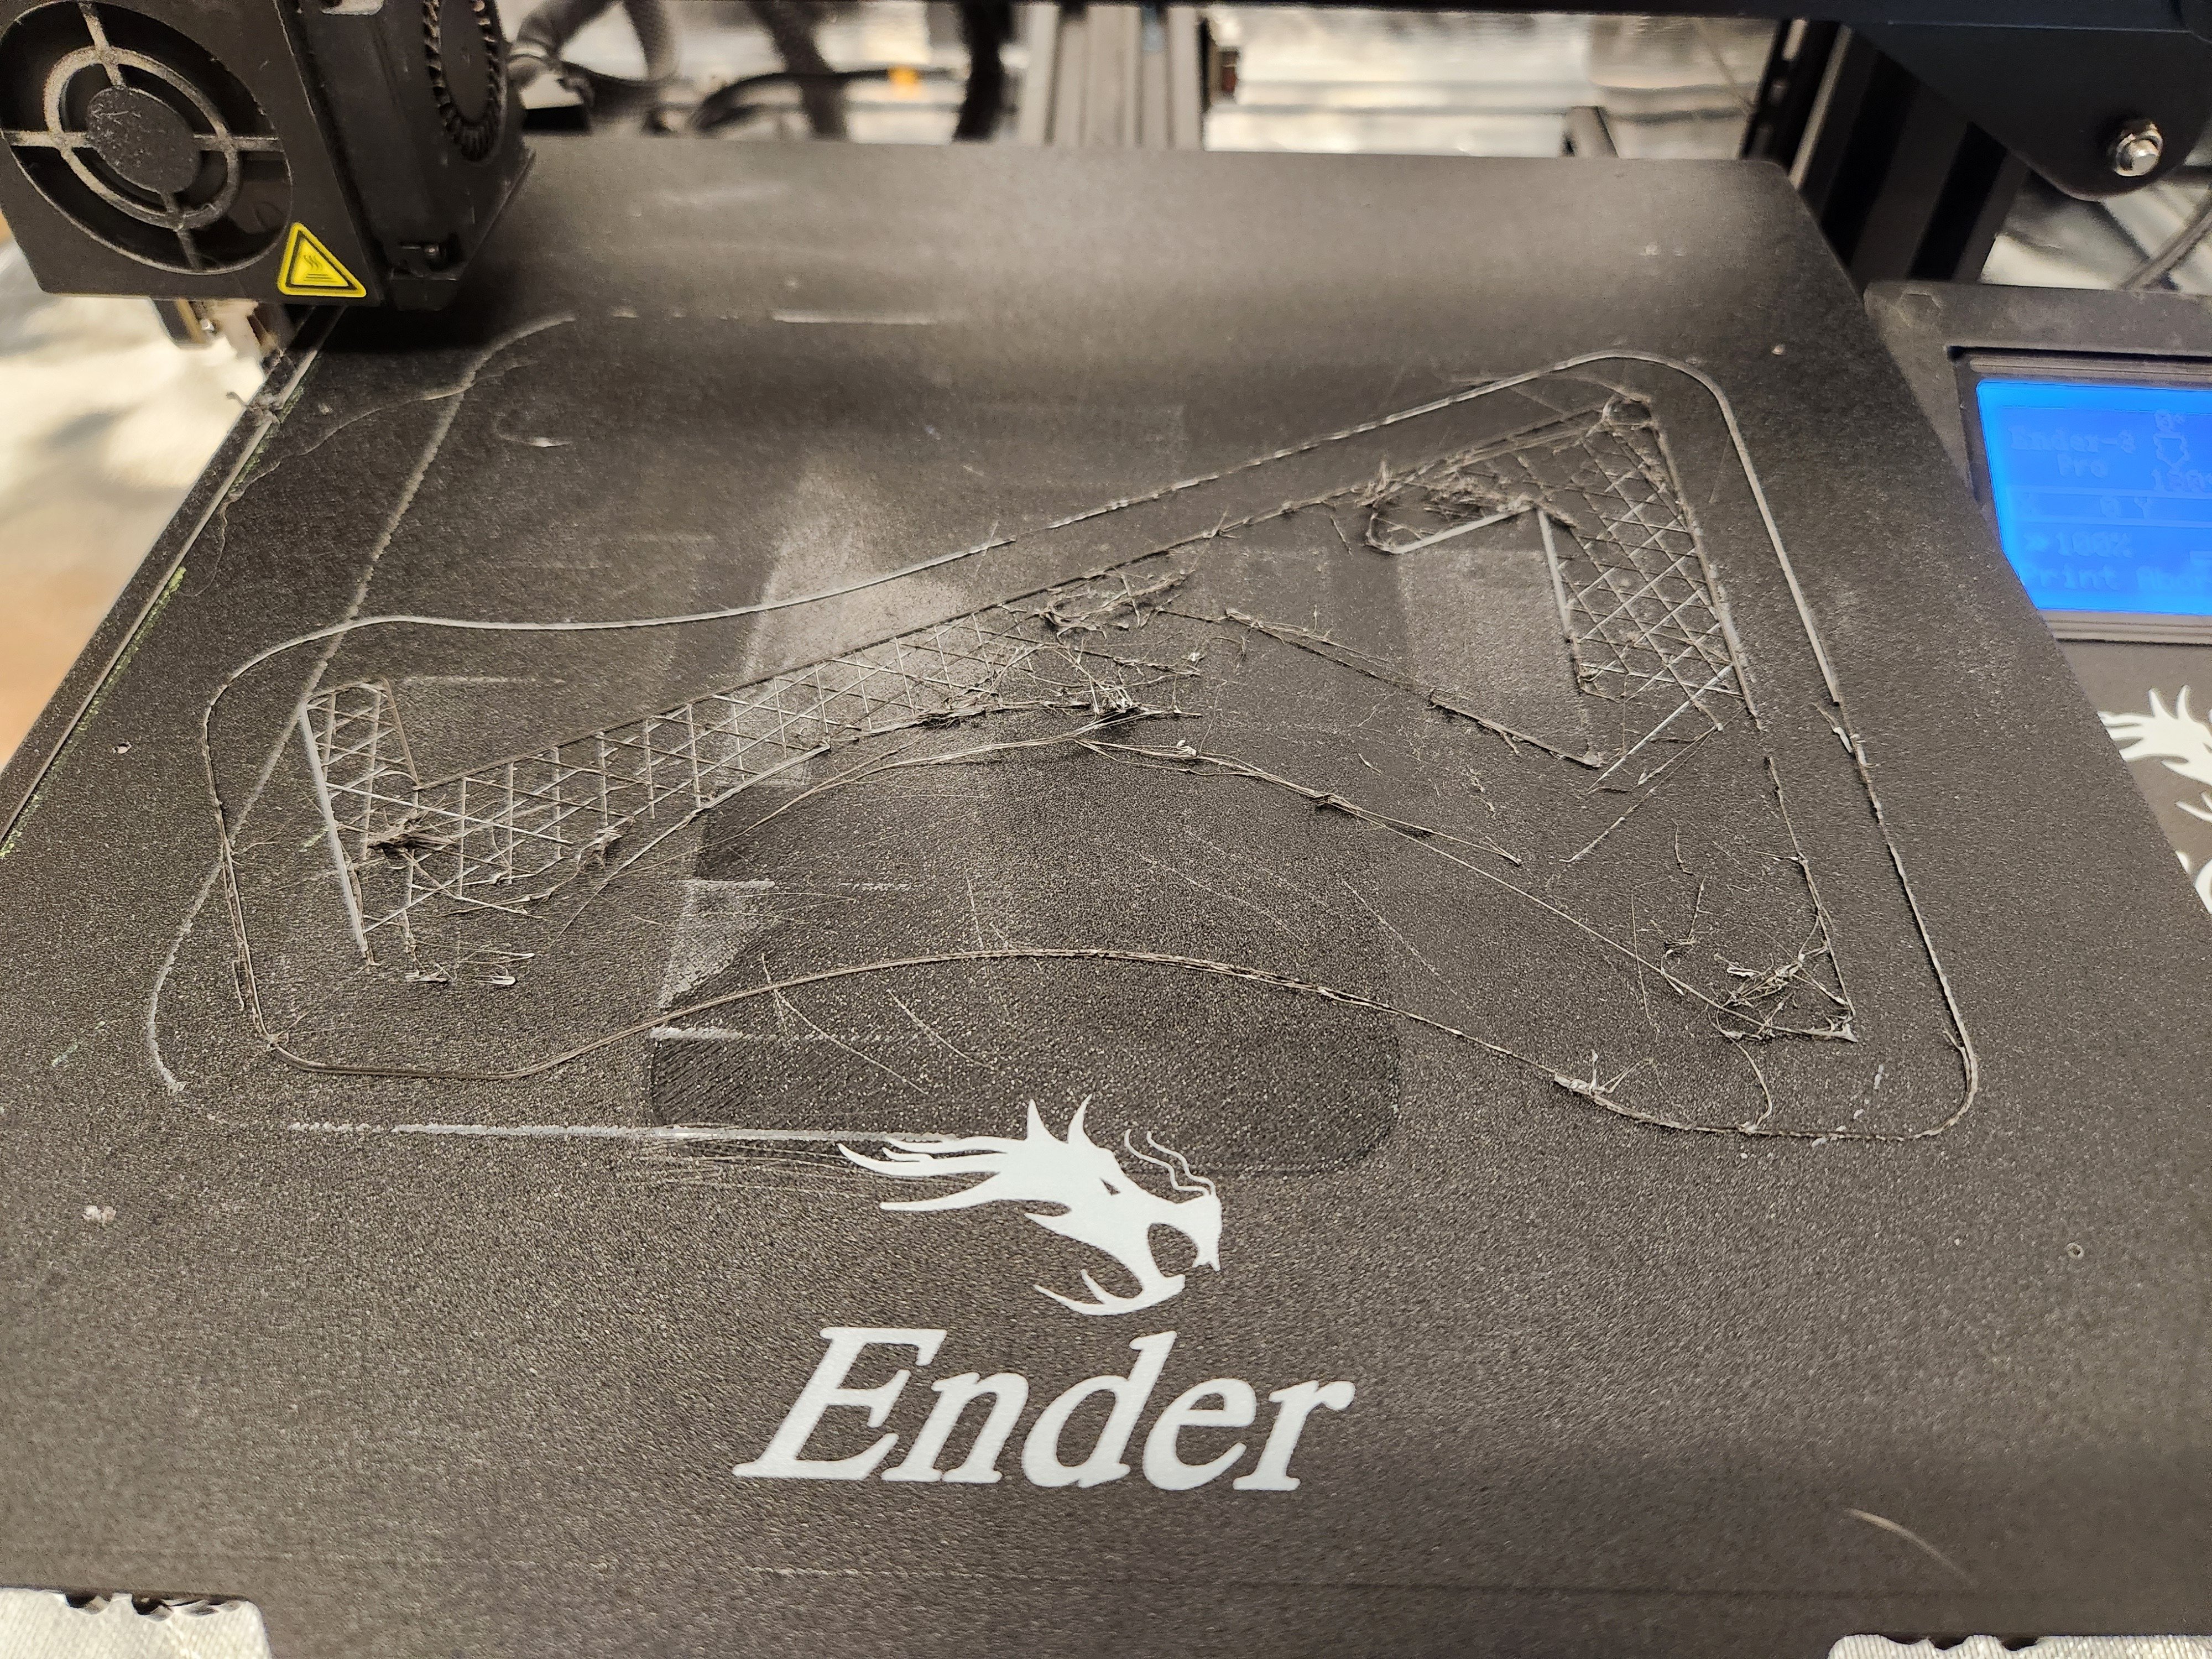
What have your first layers looked like before this? The hard to remove skirt on prior prints is usually from your nozel being too close to your bed.
Before this they were typically ok - I did tram the bed again using a sticky note just to be safe. However, since I’m new, i’m still getting a feel (literally) for how much resistance is correct. Would a print sticking too much to the bed be an indication my z offset is too low (meaning nozzle too close) ? Typically people complain about too little adhesion, and i have too much lol
Yes, leveling too low can give you very strong adhesion. It’s worth noting that PEI beds tend to lose adhesion as they and the print cool down. I can remove cooled prints without much effort off my bed, bit hot prints take some more convincing.
You can set nozzle distance with a mechanical feeler, like your sticky note, but you will need to fine tune some based on things like extrusion temperature and type of filament. This guide was made for printers with auto bed leveling, but the pictures are helpful.
Here are some signs you’re too close to the bed:
- a ripply first layer
- areas of the first layer with no filament and/or a clicking extruder motor (your nozzle is too close to the bed and can’t extrude at all)
- elephant’s foot (the first few layers stick out more horizontally than the layers above them
- a thin and brittle skirt that flakes off in pieces vs coming off as a continuous loop. Removing these tends to leave a very thin layer of residual material on your bed that you can see, but not really feel
- layer lines that are too smooshed together
That sounds exactly like my problem, I will adjust, thank you very much
Beware that this may convert you into a, “huh, nothing is sticking that well” person. In that case, clean your bed first.
First layer quality is probably the first thing to get right since everything else is literally built on top of it.
the printer says the hot end and bed are both ambient at 10C
Try leaving the hot end at ambient, turning on the heat bed to it’s printing temperature. Give it a while for everything to come up inside. considering room temp is around 20-22c or 68-73 F, it’s not quite as bad as i feared, but it could be better.
The heat bed should be able to warm it up a bit, but that is a very sharp differential, and drafts will cause problems. One thing to maybe try, is printing a tall brim. (basically a single-wall perimeter close to the part. They’re not as useful if you have an enclosure, but they can help shield a draft and keep some of the heat in from the bed better.)
Clogging could have happened if you’re trying to print too low in temperature, which, given the layer problems, that also looks likely. there’s a few variations, but you can try a cold pull to clear the nozzle (especially if it’s only partially clogged.)
My apologies, that room temperature is around 25° f, which is -4c. It’s very cold.
I just performed a cold pull, seemed to go okay, it was my first one. I feel like the majority of my problems here is simply trying to print when it’s so damn cold outside lol
Edit: The cold pull definitely seemed to completely solve my first layer issues, great suggestion. I threw a blanket over the next print, we’ll see if that helps
My apologies, that room temperature is around 25° f, which is -4c. It’s very cold
yeah. so, what’s your enclosure like? is it fully enclosed? one of those tent-thingies?
I’d suggest considering some type of insulation. Blankets work- if it’s MDF or mealmine or plywood, stappling them inside. If… insulation is problem… Blankets over a big-enough cardboard box work (just be aware of melting/fire risks. Cotton>synthetics. card board is okay. my old I3 prusa had cardboard under the heat bed instead of cork or neoprene for a long time. Try to keep it small enough to just fit everything inside. (cut the top flaps off and put it over upside down.)
The heat bed should be good enough to get it most the way there- and if you find it takes too long to heat up the inside… a heat gun can prime things nicely.
Yep, it’s the official creality enclosure. I threw a quilt over it, so here goes
Crossing my fingers for yah.
Ok, so the print came out great. Unfortunately, it was a print without top and bottom layers and honeycomb infill of only about 12%, and I accidentally squished it getting it off that extremely cold bed this morning lol. To the immediate problem I posted above though, I think it was definitely a clogged nozzle which you helped fix, and the layer adhesion is probably due to enclosure temperature being too low when I start the print. I will correct both of those things, and then go watch YouTube on how to remove a print from a cold bed haha
-4c is extreemly cold, get thermometer inside of enclosure and leave your heatbed on until it reaches 10-15C before you start printing. Even better get enclosure heater. Id also bump nozzle temp to the highest marked on your spool.
You might consider the ambient temperature in your printer space
New Lemmy Post: Issues with layer adhesion (i think) (https://lemmy.world/post/9732230)
Tagging: #3dprinting(Replying in the OP of this thread (NOT THIS BOT!) will appear as a comment in the lemmy discussion.)
I am a FOSS bot. Check my README: https://github.com/db0/lemmy-tagginator/blob/main/README.md